The iPSK (Identity Pre-Shared-Key) Manager portal server for ISE is a free utility that can be used to create iPSK accounts. What is iPSK? Identity PSKs are used to assign a unique PSK to an endpoint so that only the registered endpoint can utilize that password when connecting to a WPA2 network. Cisco ISE will be used to authenticate the endpoint based on the MAC address. When ISE authorizes the connection, a unique password will be returned to the WLC that must match what is presented by the client.
Why would you use this instead of the BYOD provisioning or the My Devices portal already built into ISE? A few reasons stand out.
- Easier configuration for the end user.
There is no need for them to install certificates or any other network supplicant. - Support for devices that do not have 802.1x supplicants.
Many IoT devices lack 802.1x support but they work with WPA2-PSK. - No shared WPA2 key!
- A little added security with WPA2 versus MAB only on an open network.
In this write-up, the endpoint must present the correct PSK tied to the MAC address. The endpoint will be redirected to a registration portal if they instead present the default PSK passphrase. This redirection will enable them to register the device with iPSK which in turn will register them with the ISE deployment. There will also be a portal where users can register endpoints (ie wireless printer) without having to go through the provisioning flow.
I will be following the installation guide I linked to above for the most part but will note differences below.
NOTE: iPSK is not supported in FlexConnect environments running WLC code below 8.5.
My setup:
- ISE 2.4 with P11
- iPSK Manager running on Ubuntu 18.04
- WLC 5508 running 8.5.135.0
I didn’t want to use a self signed certificate on my Apache node (Ubuntu Server 18.04). I wanted to utilize my internal domain CA for this set up but a 3rd party CA would be ideal so that the guest endpoints would trust the certificate on the iPSK portal. These are the steps I performed:
- Generated the CSR from the CLI.
openssl req -out ipsk.csr -new -newkey rsa:2048 -nodes -keyout /etc/ssl/private/ipsk.key - Viewed the contents of the CSR using cat ipsk.csr so I could copy the contents. Be sure to copy all of the contents including the BEGIN CERTIFICATE REQUEST and END CERTIFICATE REQUEST lines.
- Once the new certificate was issued, open it with a text editor and copy all of the contents.
- Back on the server, I browsed to /etc/ssl/certs and created the file ipsk.crt. The contents of the certificate file I copied in step 3 were pasted into this file.
- Created the ssl directory in /etc/apache2.
- Created the file for my root CA after downloading a copy, editing with a text editor, copy all contents, and pasting to the new file created (ie secdemoca.crt).
Since I am not using a self signed certificate, steps 10a and 10b were modified with the following information:
SSLCertificateFile /etc/ssl/certs/ipsk.crt
SSLCertificateKeyFile /etc/ssl/private/ipsk.key
SSLCertificateChainFile /etc/apache2/ssl/secdemoca.crt
I then finished out the installation guide steps including restarting the Apache service and connecting to the iPSK admin web GUI.
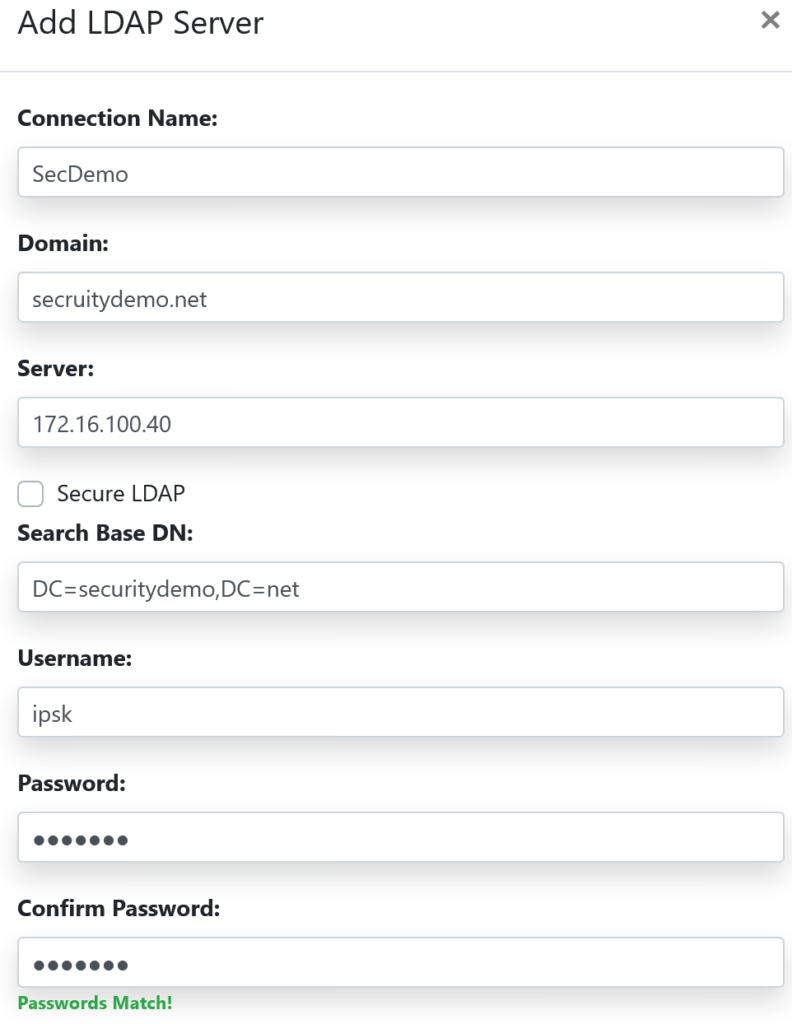
Creating a connection to my AD was a snap. I went to LDAP Servers > Add LDAP Server and filled in the required info. I used an AD account, iPSK, that was only a member of the domain (no admin privilege).
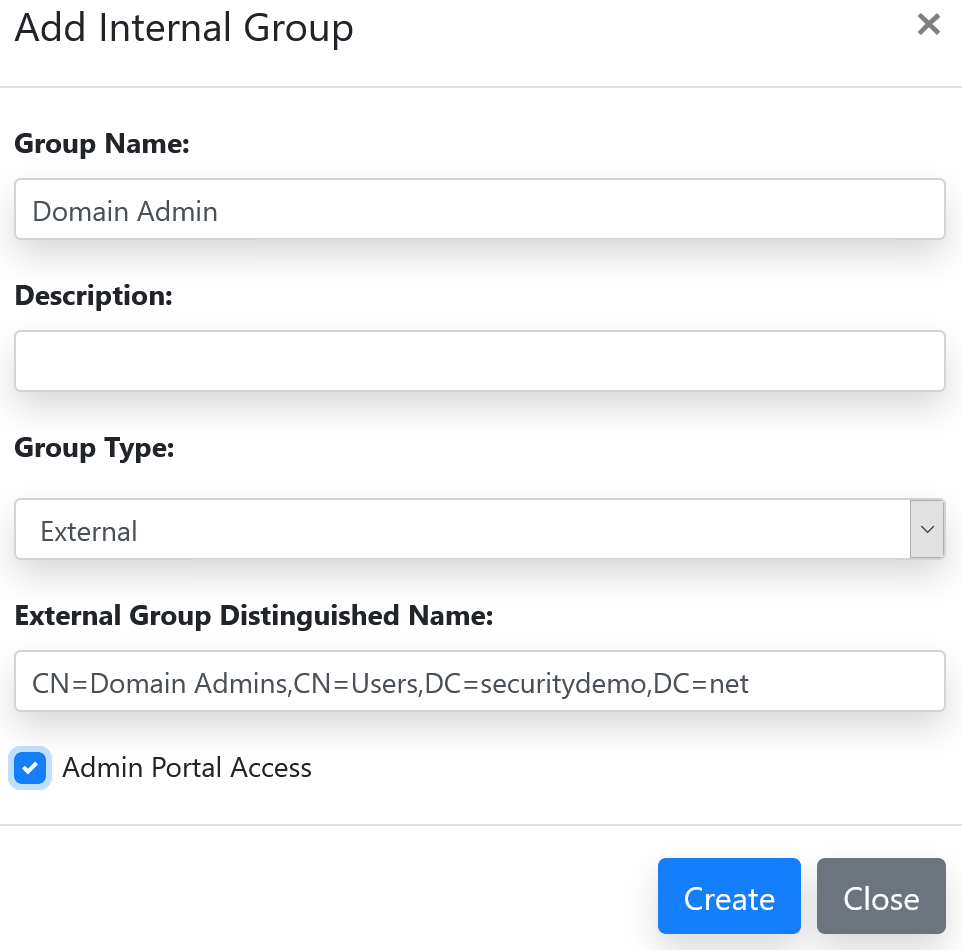
For the Group configuration, I created 2 groups like the install guide shows as an example. Note that you will need to provide the Distinguished Name.
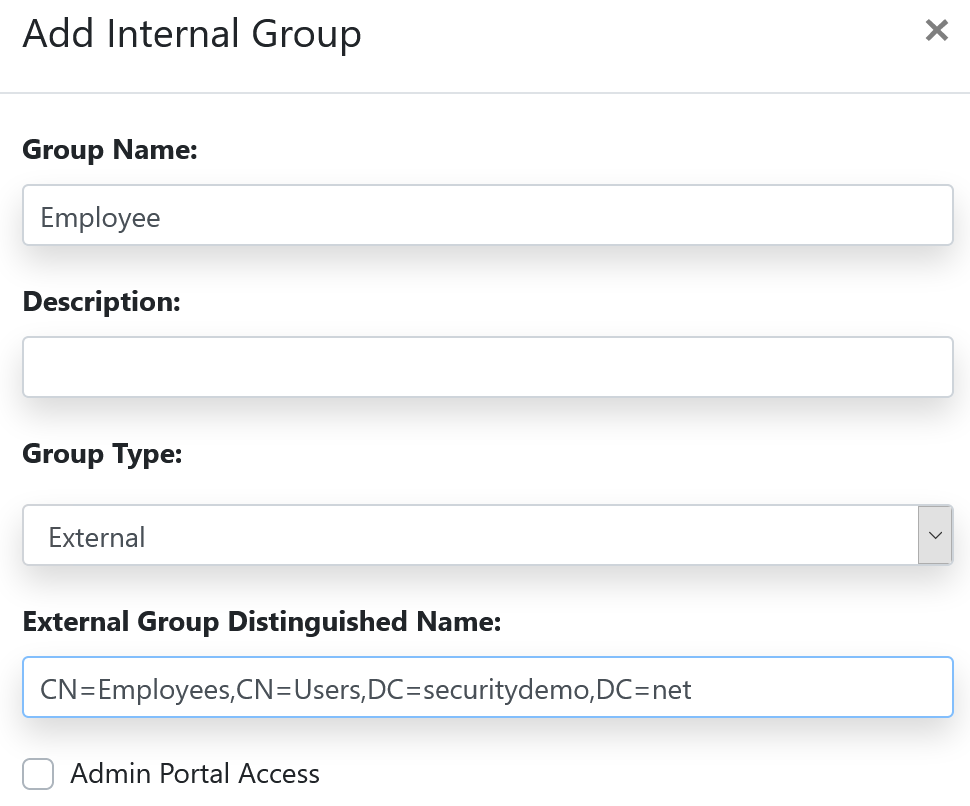
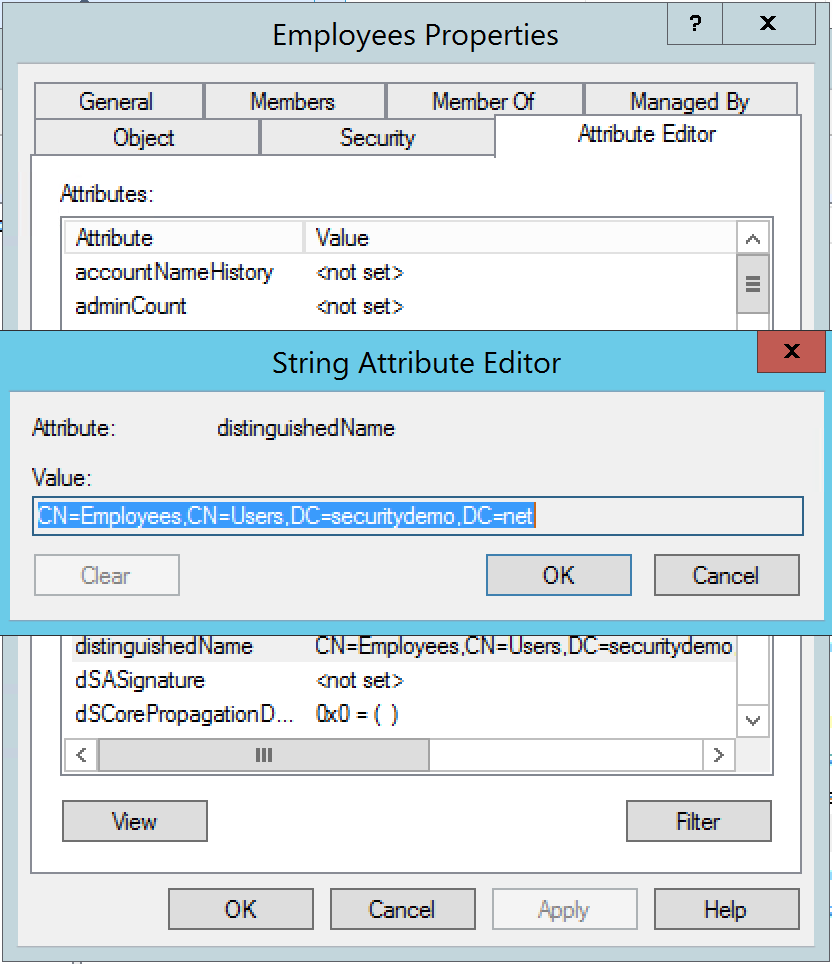
If you are not sure how that should be written, you can easily find it by looking at the properties of the AD group. Go to the Attribute Editor tab and copy the information found for the distinguishedName attribute.
I also added an administrative group and assigned Domain Admins rights to log into the iPSK admin portal.
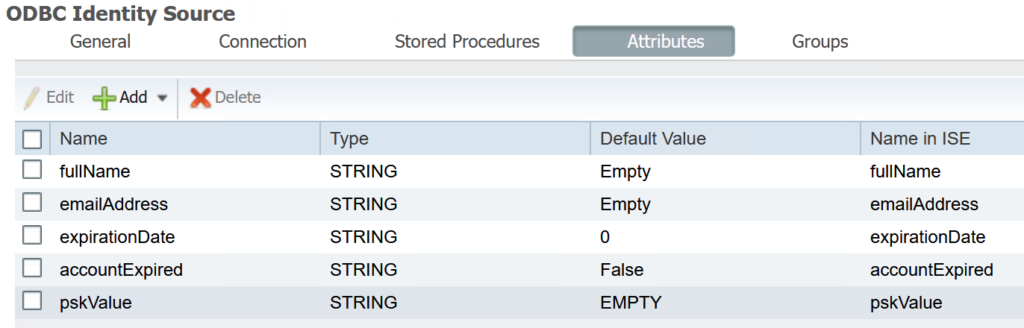
In the section for configuring the ODBC connection from ISE to the iPSK server, I chose to read the fullName, emailAddress, expirationDate, accountExpired, and pskValue.
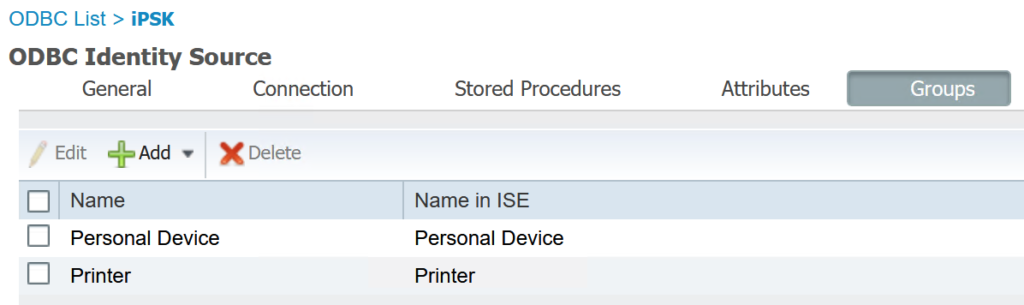
As well as adding the endpoint groups I had created.
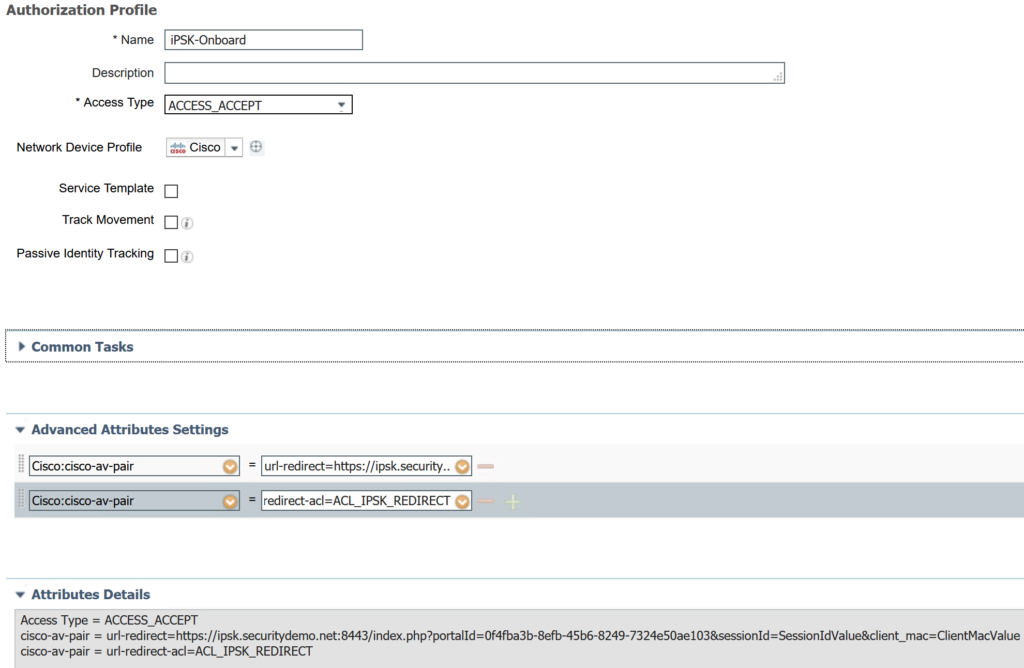
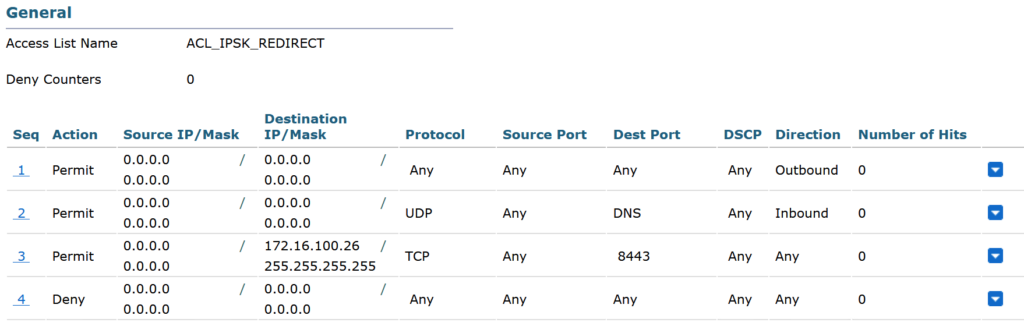
The authorization profile for onboarding a device requires a redirect ACL. Since I am using a WLC running AireOS 8.5, I needed to create the ACL on the WLC. The ACL permits all traffic to the client, all DNS traffic out, and access to the iPSK portal running on port 8443. All other traffic is blocked.
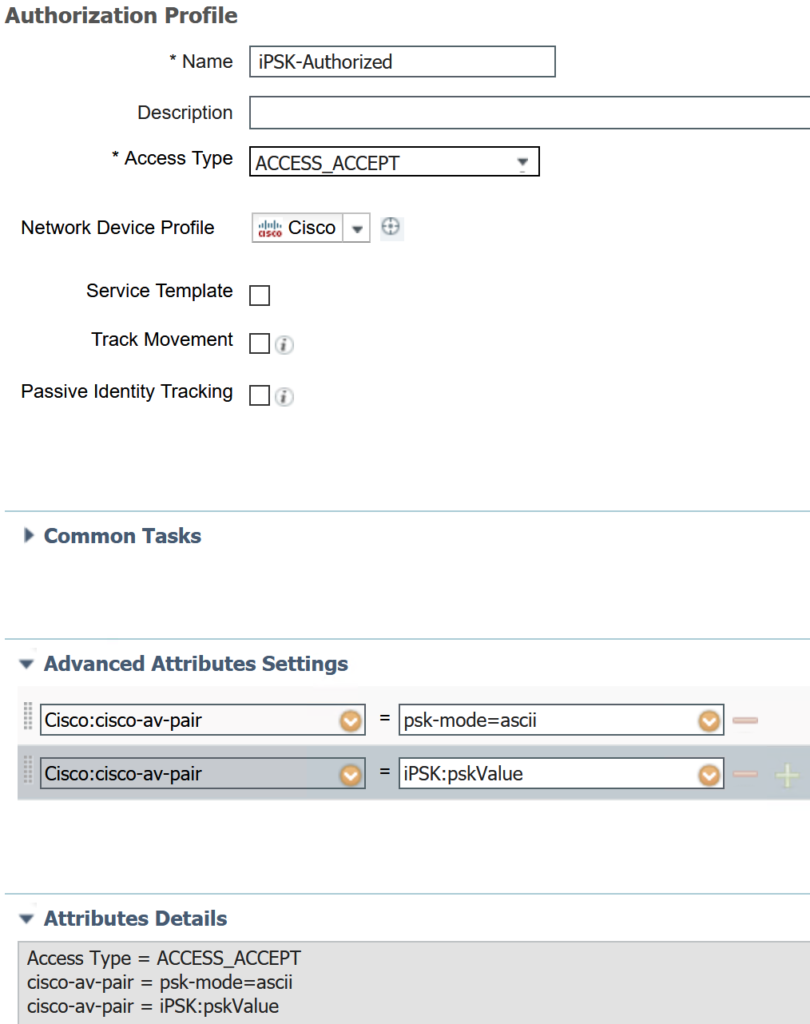
The authorization profile for authorized devices (ie valid iPSK) is simply allowing access at this time. This is only for demonstration purposes. It is always highly recommended to give the least privilege access to devices. Especially due to the increased security risk presented by BYOD and IoT devices.
The WLAN on the WLC was configured as follows:
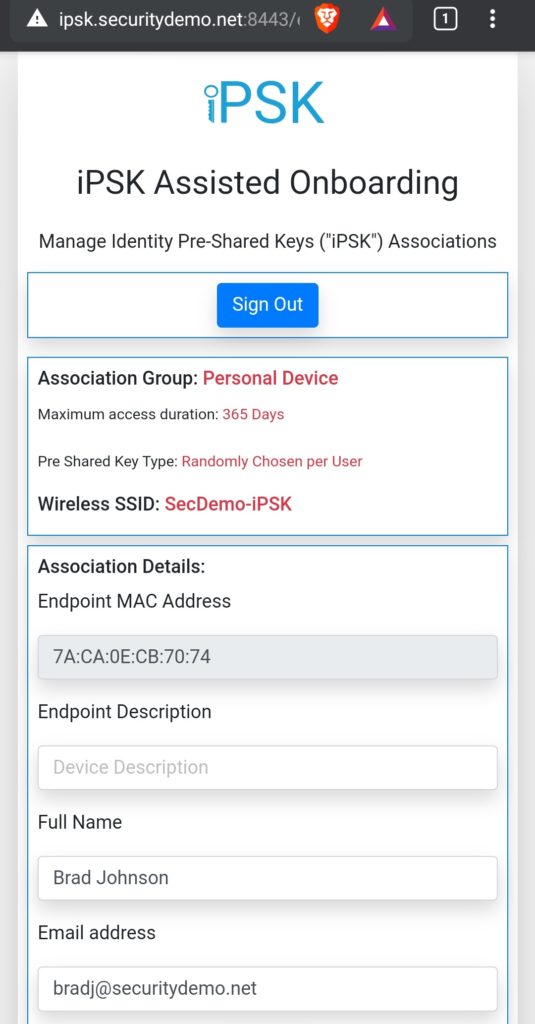
- SSID: SecDemo-iPSK
- Security – Layer 2
- WPA+WPA2
- MAC filtering enabled
- 802.1x disabled
- PSK enabled
- Passphrase: LetMeIn!
- Security – AAA Servers
- Added ISE node for authentication and authorization
- Removed Local and LDAP from authentication order
- Advanced
- Enabled Allow AAA Override
- NAC State: ISE NAC
- Radius Client Profiling: Enabled both DHCP and HTTP profiling
The policy set is configured with a single condition: RADIUS called station ID ends with SecDemo-iPSK.

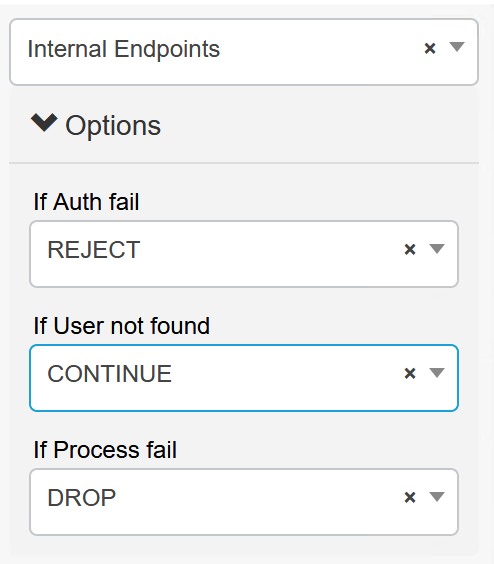
The policy set authentication policy is configured exactly like a guest policy. We will look at the Internal Endpoints database for authentication. If the endpoint is not found (ie new connection), the process will continue to authorization.
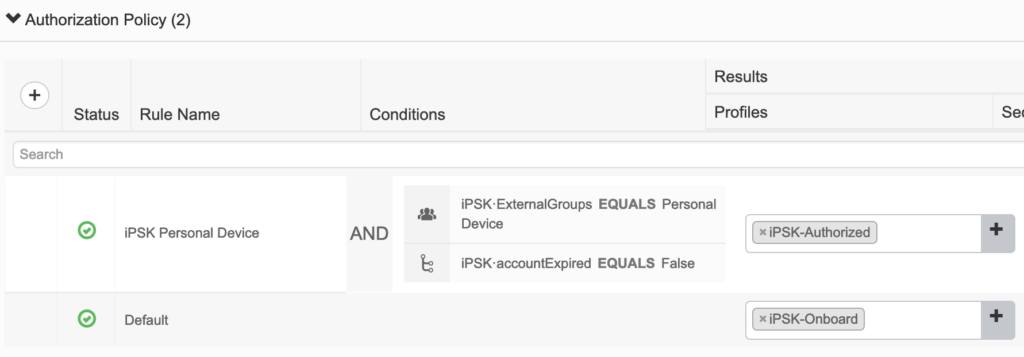
The authorization policy is configured to authorize the device if it exist in the iPSK database, the correct PSK was used, and the account is not expired. If the device fails any of those checks, the default rule will redirect them to the iPSK portal to register the device.
Time to test!
As you can see from the Live Logs:
- My mobile phone connected to the SecDemo-iPSK SSID using the default LetMeIn! passphrase.
- I initially hit the default authorization which led me to be redirected to the iPSK portal.
- After typing in my credentials and logging in, I was presented with a screen showing my information. This includes the MAC address of my device.
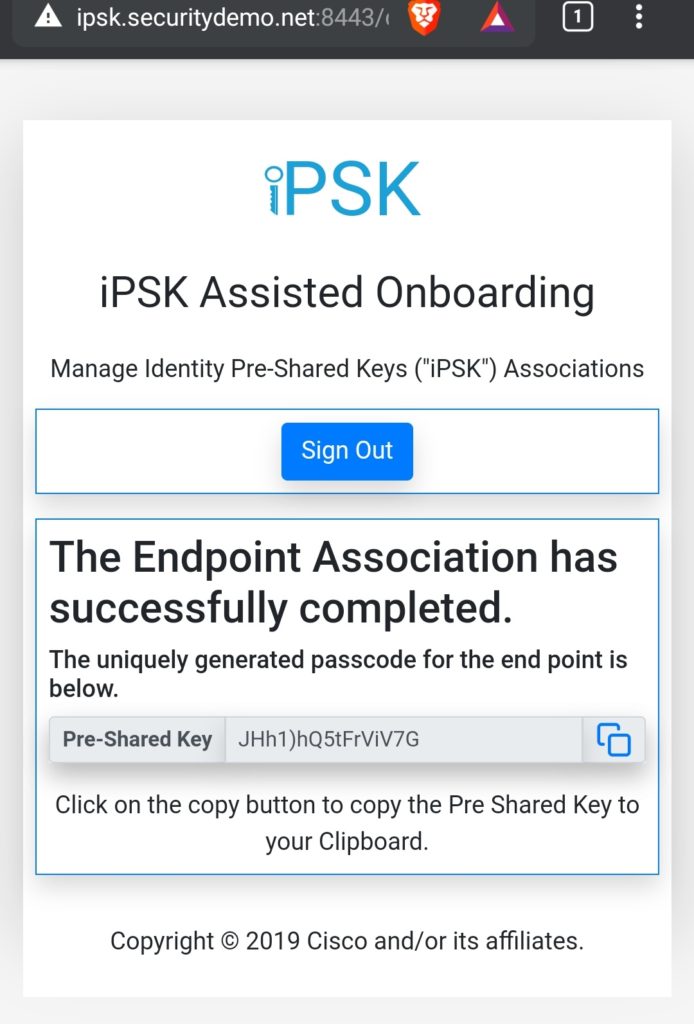
- Clicking submit took me to a screen showing my personal passphrase for the connection.
- I closed out of the portal, went into my phone settings, and forgot the wireless network.
- I reconnected to the SecDemo-iPSK network but this time used my personal passphrase that was assigned.
- I successfully logged onto the network with full access.

Entries above that show my device hitting full access.
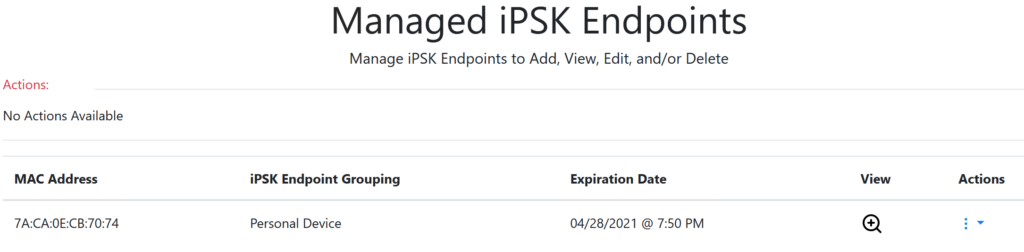
The iPSK Manager allows me to see the endpoints.

I can see iPSK Manager being used in several instances in the future. Especially when it comes to medical installs since those locations usually have several devices that can connect to wireless networks but only using WPA2-PSK. The ability to assign a different passphrase per device or user means a single user with multiple devices could possibly use the same passphrase for all of their devices (as long as they are registered with iPSK Manager).
Great blog. Is it true iPSK is not supported in FlexConnect environments? Per Cisco, it is…https://www.cisco.com/c/en/us/support/docs/wireless/5500-series-wireless-controllers/112042-technote-wlc-00.html
Nice catch. When the iPSK Manager was released, it wasn’t supported on FlexConnect. It’s nice to see WLC code 8.5 and up does support it.
Can Ipsk interoperate on an ssid with dot1x or does it require a separate and unique ssid. We are trying the limit the amount of ssid we run. Thanks Greg
That isn’t a scenario that I have tried but it may be possible since the iPSK database is just an external ODBC connection. I’ll have to test that in my lab.